


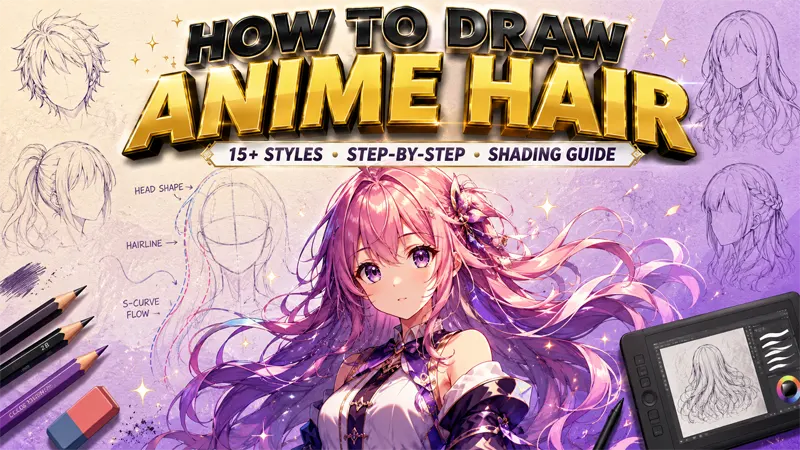

Quick answer: To draw anime hair, start with a basic head shape, mark the hairline, then build the hair in three sections: front (bangs), sides, and back. Draw hair in chunky clumps rather than individual strands, use S-curves for natural flow, and shade with one highlight near the crown and a darker base. Anime hair is more stylized than realistic — it uses exaggerated shapes, gravity-defying spikes, and bold color choices to express character personality. The whole process takes 30–60 minutes for beginners and improves dramatically with practice.
What Makes Anime Hair Different from Realistic Hair
Anime hair breaks rules that realistic hair follows. Understanding these differences is the first step toward drawing it well:
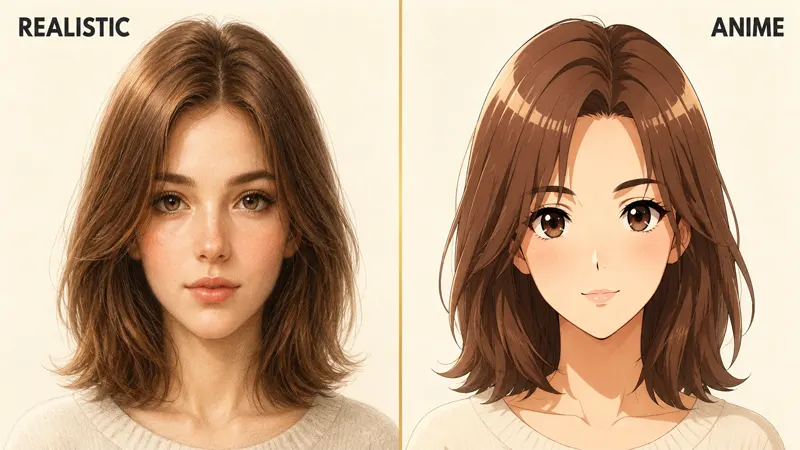
- Chunks, not strands. Real hair is drawn with many fine individual strands. Anime hair groups hair into a smaller number of chunky clumps with defined edges. Think 5–15 chunks per character, not 5,000 strands.
- Gravity is optional. Spiky shounen hair, gravity-defying ahoge (the small flyaway strand on top), and floating bangs all violate physics. That's intentional — it's part of the visual language.
- Sharp silhouettes. Anime hairstyles read as recognizable silhouettes even from a distance. A spiky shounen protagonist looks different in shadow than a magical girl with long flowing locks.
- Bold color choices. Pink, purple, white, blue, green — colors that don't naturally occur in human hair are core to anime aesthetic. Color signals personality (pink for cheerful, white for mysterious, blue for cold or aloof).
- Personality through hairstyle. The hair often tells you who the character is before they speak. Tsundere characters have twin tails. Tough guys have spikes. Mysterious characters have eye-covering bangs.
Tools You Need (Traditional & Digital)
You can draw anime hair with cheap supplies or expensive software — both produce great results. Here's what works at each level:
For Traditional Drawing (Paper & Pencil)
- H or 2H pencil — for initial light sketches that erase easily
- HB pencil — for medium-weight outlines
- 2B or 4B pencil — for darker outlines and shading
- Kneaded eraser — for lifting graphite to create highlights
- Tombow Mono Zero eraser or mechanical eraser — for precise highlight cleanup
- Smooth paper — Bristol board or marker paper (avoid textured sketch paper)
For Digital Drawing
- Clip Studio Paint — industry standard for anime/manga, ~$50 one-time
- Krita — free, professional-level brushes, excellent for hair textures
- Procreate (iPad) — $13 one-time, great for beginners on iPad
- Photoshop — works but overkill unless you already have it
- iPad with Apple Pencil or any drawing tablet — pressure sensitivity matters more than software choice
The 3-Section Method (How Anime Hair Is Built)
Every anime hairstyle — from spiky shounen male to long flowing female — uses the same 3-section breakdown. Master this and you can draw any style.
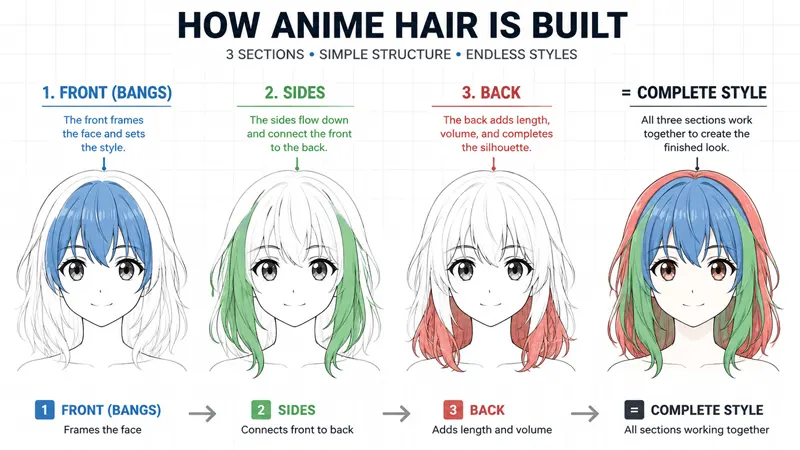
1. Front Section (Bangs)
The hair that frames the forehead and face. Includes fringe, bangs, and the small chunks that fall over the eyes. This is where most character personality lives — eye-covering bangs read mysterious, swept-aside bangs read confident.
2. Side Section
The hair that hugs the sides of the head and falls past the ears. Provides the "frame" around the face. Short side hair = clean look; long side hair = soft, romantic.
3. Back Section
The hair that follows the curve of the back of the head. Can be short (cropped/spiky), medium (just past the neck), or long (flowing down the back). The back section determines the silhouette most.
How to Draw Anime Hair — Step-by-Step Beginner Tutorial
Follow these steps to draw your first anime hairstyle. Use a female character with shoulder-length straight hair as your starting point — it's the most forgiving style for beginners.
- Draw the head shape. Start with a circle, then add a vertical line down the center and a horizontal line for the eyes. Add a softer chin shape below. This is your base — even though most of it will be covered, you need it for proper proportions.
- Mark the hairline. Draw a curved line about 1/4 down from the top of the head. This is where the hair "starts." Anime hairlines are usually higher than realistic ones to leave room for tall, voluminous hairstyles.
- Draw the front section (bangs) first. Start at the center of the forehead. Draw 3–5 chunky bang shapes pointing downward and slightly outward. Use S-curves — even straight hair should have subtle curves to look alive. Vary the lengths.
- Draw the side sections. Add hair that "hugs" the sides of the face, starting from the hairline and extending past the ears. Keep this looser than the bangs. Use sweeping curves to suggest weight.
- Draw the back section. The back hair should follow the curve of the skull, then extend outward to your desired length. For shoulder-length hair, end the back chunks just past the neck.
- Add 1–3 stray strands (ahoge). The signature gravity-defying strand on top adds personality. Skip this for serious characters, include it for cheerful ones.
- Erase your guidelines. Remove the head circle, hairline, and any sketch marks that are now covered by hair. Keep only the final hair outline and visible face.
- Refine the outline. Press harder with your HB or 2B pencil to make the final hair outline pop. Vary line thickness — thicker on the outside edges, thinner where strands meet.
15+ Popular Anime Hair Styles (Step-by-Step Reference)
Once you've mastered the basic process, here are the most commonly drawn anime hairstyles and what makes each one work:
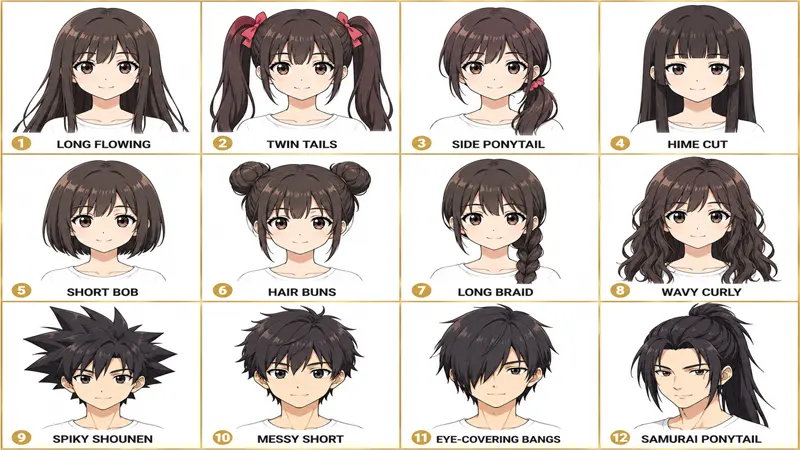
Female Styles
1. Long Flowing Hair
Classic protagonist style. Bangs in front, long curtain of hair flowing past shoulders. Draw with sweeping S-curves and minimal interruption.
2. Twin Tails / Pigtails
Two ponytails on either side of the head. Tied with ribbons or scrunchies. Strongly associated with tsundere and energetic characters.
3. Side Ponytail
All the hair gathered to one side, tied off, and flowing over the shoulder. Soft, romantic look.
4. Hair Buns
One or two buns positioned on the top or back of the head. Common in martial artist or "wise" characters. Add a few hanging strands for realism.
5. Short Bob
Hair cut to chin or jaw length, with bangs. Clean, modern, often used for serious or analytical characters.
6. Long Braid
A single braid down the back. Used for traditional or magical characters. See our braiding reference guide for how braid patterns work.
7. Hime Cut
Straight-across bangs with two long side locks framing the face, and the rest cut straight at the back. Classic Japanese princess style.
8. Wavy / Curly Long Hair
Long hair with defined waves or curls throughout. Requires careful S-curve practice. Often used for confident, glamorous characters.
Male Styles
9. Spiky Shounen Hair
The Goku/Naruto style — wild, pointy spikes radiating from the head. Draw exaggerated triangular shapes with sharp tips.
10. Messy Short Hair
Casual, slightly disheveled look. Draw chunks in different directions to suggest "just woke up" energy without looking too unkempt.
11. Long Bangs Covering One Eye
Mysterious bishounen style. One side of the bangs falls long enough to obscure an eye, the other side is tucked behind the ear.
12. Slicked Back
All hair combed back, exposing the forehead. Strong, formal look. Common for businessmen or villain characters.
13. Long Male Ponytail (Samurai)
Tied at the top or back of the head, hair flows down. Often seen in samurai, swordsmen, or traditional warrior characters. Inspired by historical men's long hairstyles.
14. Undercut / Modern Fade
Reflects real-world trends. Short faded sides with longer textured top, similar to a blowout taper or modern mullet fade in real life.
15. Wolf / Mullet Style
Layered top with longer back. Increasingly popular in modern anime, reflecting current 2026 men's fashion. Adds a rebellious vibe.
16. Curtain Bangs / K-Pop Style
Middle-parted bangs falling on either side of the face. Reflects current K-pop and modern anime fashion trends.
Drawing Anime Hair by Character Archetype
Anime uses hair as visual shorthand for character type. Knowing these archetypes helps you design hair that immediately communicates who your character is:
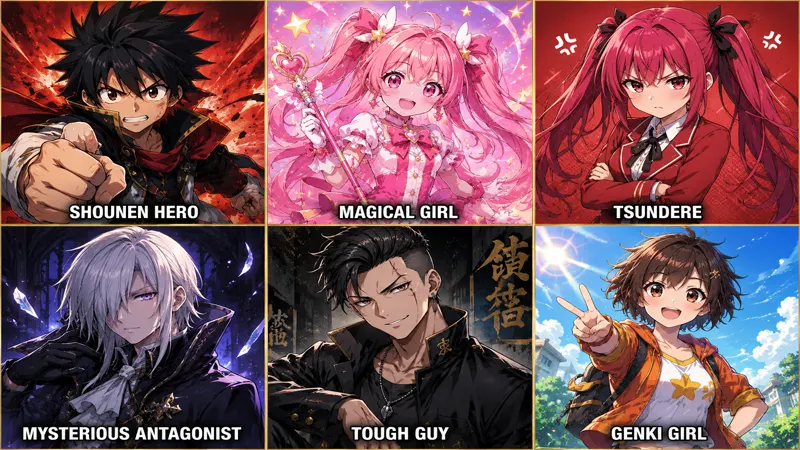
| Archetype | Typical Hair | Color | Example Vibe |
|---|---|---|---|
| Shounen Protagonist | Spiky, gravity-defying, messy | Black, dark brown, occasionally bright (yellow, orange) | Heroic, energetic, determined |
| Magical Girl | Long flowing, often with bows or accessories | Pink, blue, blonde, sometimes pastel | Cheerful, sweet, optimistic |
| Tsundere | Twin tails, defined bangs | Pink, red, blonde, brown | Sharp, defensive, secretly sweet |
| Mysterious Antagonist | Long bangs covering one eye, sleek | White, silver, black, deep purple | Cold, dangerous, calculating |
| Ojou-sama (Rich Girl) | Hime cut, ringlet curls, elaborate | Blonde, deep brown, sometimes pink | Refined, aristocratic, demanding |
| Tough Guy / Delinquent | Slicked back, undercut, modern fade | Black, dark brown, sometimes bleached blonde | Edgy, rebellious, confident |
| Genki Girl (Energetic) | Messy short hair, side ponytail, ahoge | Bright (orange, red, pink, neon) | Bouncy, loud, always smiling |
| Cool / Stoic Character | Long sleek hair, side-swept bangs | Black, dark blue, silver | Reserved, intelligent, distant |
| Sensei / Mentor | Messy adult hair, sometimes graying | Black with gray, brown, white at temples | Wise, experienced, slightly tired |
Anime Hair Shading — The Simple Formula
Most anime hair shading uses just three values: base color, shadow, and highlight. That's it. The complexity comes from where you place them, not how many you use.
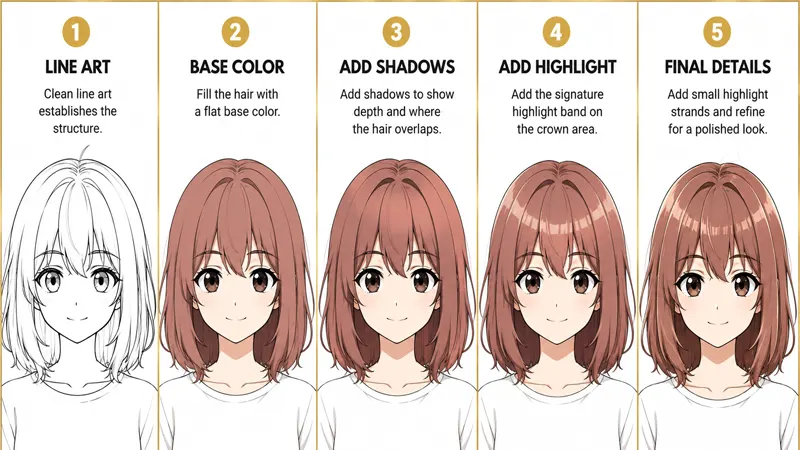
- Fill the hair area with the base color. This is the "flat" middle value. For black hair, use medium gray. For pink, use medium pink. For blonde, use a warm tan-yellow.
- Add shadows. Darken the base of each hair chunk (where it meets the scalp), the under-layers, and any areas where one chunk overlaps another. Use a slightly darker version of the base color, not pure black.
- Add the signature anime highlight. A curved horizontal band of light on the crown area — usually shaped like a wide flat "C" or a zigzag. This is the most iconic element of anime hair coloring. Position it where the top of the head catches light.
- Add small detail highlights. Optional thin lines or small dots scattered through the hair to suggest individual strands catching light. Don't overdo this — 8–15 small marks total is plenty.
- Soften with a blending pass. Use a soft brush or smudge tool to slightly blend the edges between shadow and base — but keep the highlight band crisp.
Color Theory for Anime Hair
Anime uses bold non-realistic colors deliberately. Here's how to pick colors that work:
Color Meaning in Anime
- Black — neutral, default, often used for relatable protagonists
- Brown — warm, grounded, "everyman" energy
- Blonde / Yellow — energetic, attention-grabbing, often used for loud or heroic characters
- Red / Orange — fiery, passionate, aggressive, or sensual
- Pink — cute, cheerful, romantic, magical
- Blue — cool, calm, intelligent, sometimes melancholic
- Purple — mysterious, royal, magical, sometimes villainous
- Green — quirky, otherworldly, sometimes connected to nature or oddness
- White / Silver — mysterious, otherworldly, sometimes evil, sometimes pure
- Multicolored / Gradient — extraordinary characters, often magical or supernatural
How to Pick Shading Colors
Don't just darken your base color for shadows. Use complementary undertones:
- Warm hair (blonde, brown, red): shadow with darker warm tones, but add cool purple or blue undertones in the deepest shadows
- Cool hair (blue, purple, white): shadow with darker cool tones, but warm up the highlights with hints of orange or yellow
- Black hair: shadow with very dark blue or very dark purple — pure black looks dead
- White hair: shadow with light blue, lavender, or pale gray. For the highlights on white hair, use pure white sparingly
If you're drawing characters with realistic hair colors and want color references for highlights and lowlights, our dark brown hair with highlights guide shows real-world color combinations that translate well to anime art.
Drawing Anime Hair in Motion
Anime characters constantly move — running, jumping, fighting, being hit by gusts of wind. Static hair drawings feel lifeless. Here's how to add motion:
- Draw the main flow line first. Before adding any strands, sketch a single curved line showing the overall direction the hair is moving. Then hang the strands off that line.
- Wind direction matters. If wind blows from the left, ALL the hair should respond — bangs blow to the right, side hair lifts up, back hair streams sideways.
- Add "delay" to motion. When a character suddenly stops, the hair doesn't stop instantly. Draw it still flowing a beat behind the body for realistic momentum.
- Use longer chunks for fast motion. Hair flying through the air should appear in longer, thinner streams. Slow motion uses shorter, fuller chunks.
- Spiky hair STILL has flow. Even Goku's hair has a clear "back" direction even though the spikes look chaotic. Find the underlying flow and design around it.
10 Common Anime Hair Mistakes (And How to Fix Them)
❌ Drawing hair as a helmet first
Fix: Design the silhouette from the start. Sketch the overall hair shape before adding any internal details. Anime hair is shape-first, texture-second.
❌ Equal-thickness chunks throughout
Fix: Vary chunk sizes. Some thick clumps, some thin wisps, some medium. Equal thickness looks robotic.
❌ Forgetting the hairline
Fix: Even covered hair needs a hairline reference. Sketch it first, then cover with the hair you want.
❌ Drawing too many tiny strands
Fix: Use chunks of 3-15 hairs, not individual hairs. Realistic hair has thousands of strands; anime hair has dozens of chunks.
❌ Symmetrical bangs
Fix: Even balanced bangs should have small asymmetries. Slight differences in chunk size or angle make hair feel alive.
❌ Hair lying flat against the head
Fix: Lift the hair slightly off the skull. Hair has volume — it doesn't hug the head like a swim cap.
❌ Same length all around
Fix: Even "uniform length" hair should have small variations. Pure uniformity looks unnatural.
❌ Highlight placed too low
Fix: The highlight band sits near the crown — top third of the head. Lower highlights make hair look flat.
❌ Black hair shaded with pure black
Fix: Use very dark blue or very dark purple for the shadows. Pure black looks dead and lifeless.
❌ Not using reference
Fix: Always have reference images open while drawing. Pull from anime screenshots, art books, or photographs of real hairstyles like a modern mullet fade for character inspiration.
How to Practice (Improvement Roadmap)
Drawing anime hair well takes consistent practice. Here's a 30-day improvement plan:
- Week 1 — Foundations: Draw the same simple hairstyle (medium-length, straight, female) 30 times. Don't move on until you can do it without thinking.
- Week 2 — Variations: Try a different style each day. Spiky, ponytail, bun, twin tails, bob, hime cut. Focus on getting the silhouettes right.
- Week 3 — Color & Shading: Add color and the three-value shading to all the styles from Week 2. Don't add details until you can place the highlight correctly.
- Week 4 — Motion & Personality: Draw hair in motion (running, jumping, wind). Try matching specific character archetypes from the table above.
- Blowout Taper Haircut Guide — reference for modern anime male character hair
- Modern Mullet Fade Guide — reference for trendy 2026 male character cuts
- African Hair Braiding Reference — for drawing diverse character hairstyles
- Slavic Braids Reference — fantasy and historical character braid styles
- Viking Haircut Reference — for samurai, warrior, and historical fantasy characters
- Hair Color & Highlights Reference — color combinations that translate to anime art
How to Draw Anime Hair — Frequently Asked Questions
What's the easiest anime hairstyle to draw for beginners?
Medium-length straight hair with simple bangs is the easiest. There are fewer chunks to manage, the silhouette is forgiving, and small mistakes don't ruin the drawing. Avoid spiky hair, complex updos, and long curly styles until you've practiced the basic 3-section method for a few weeks.
How long does it take to draw anime hair well?
Most beginners produce passable anime hair within 2–4 weeks of daily practice (15–30 minutes per day). To draw confidently in any style without reference takes 6–12 months. To reach professional manga/anime industry quality typically requires 3+ years of focused practice.
Do I need a drawing tablet to draw anime hair?
No — paper and pencil work perfectly fine for learning. Many professional manga artists still work primarily in traditional media. A drawing tablet helps if you want to share work online or use digital coloring techniques, but it's not required for skill development.
Why does my anime hair look stiff or "helmet-like"?
You're probably drawing the silhouette as a rounded shape that hugs the skull, then adding decorative lines on top. Instead, design the hair as if it has weight and volume — let chunks separate from the head, vary lengths and angles, and use S-curves rather than straight lines.
What software is best for digital anime hair drawing?
Clip Studio Paint is the industry standard for anime and manga artists. Krita is the best free alternative and has excellent brush engines. Procreate works well on iPad. Photoshop works but is overkill for most beginners. Software choice matters less than practice — pick one you can afford and stick with it.
How do I draw the signature anime hair highlight?
After applying base color and shadows, add a curved horizontal band of light on the crown area — typically shaped like a flattened "C" or a zigzag. Position it in the top third of the hair. Use white or a very light version of your base color. Keep the edges crisp, not blended.
What's the difference between anime and manga hair?
Manga hair is typically drawn for black-and-white print, so artists rely on screentones, hatching, and contrast to suggest color and texture. Anime hair is drawn with flat color fills, simplified shading (usually 2–3 values), and bold highlight bands optimized for animation. The underlying construction is the same — only the rendering differs.
Should I copy anime artists' styles or develop my own?
Beginners should copy. Spend the first 1–2 years studying and reproducing styles you admire. Your "own style" naturally emerges from the combination of influences you absorb. Trying to be "original" before you've learned the fundamentals leads to bad art for years longer than necessary.
How do I draw anime hair for male characters differently from female?
The biggest differences: male anime hair is typically shorter, has more defined spikes and angular chunks, sits closer to the head, and uses more aggressive S-curves. Female anime hair tends to be longer, has softer flowing chunks, lifts higher off the skull, and uses gentler S-curves. The 3-section method works for both.
Why does my colored anime hair look "muddy"?
Usually because you're using too many similar mid-tones without enough contrast between shadow, base, and highlight. Anime hair coloring works on bold separation: each value should be clearly different from the others. If your shadows look almost the same as the base color, deepen the shadows further. The highlight should pop visibly against the base.
This tutorial covers fundamental anime hair drawing techniques used by both traditional and digital artists in 2026. Skill development requires consistent practice — there are no shortcuts. Use reference images, study artists you admire, and draw regularly to improve.
